Set up returns in your webshop (RMA).
With the Return Merchandise Authorization (RMA) module, customers can request returns in your webshop. You configure which products they can return, which reasons they can select, and which users can submit a request.
Prerequisites
- The RMA module is active in your environment.
- If you want to exclude products from returns, or limit a return reason to certain products, the tags for these products exist.
Create the Return Reasons
Create the reasons customers can select when requesting a return, such as a damaged product or an incorrect item.
- Go to Other Settings > eCommerce Texts.
- Click New.
- Set Type to RMA Reason.
- In Text, enter the reason that your customer sees in the webshop. You can translate this text.
- If your ERP integration uses return reason codes, enter the corresponding code in Code
- Click Save.
Repeat these steps for each return reason. To stop using a reason, uncheck Active. Existing return requests keep that reason.
Set up the Reference Sequence
The reference sequence defines how return requests are numbered. You can add a prefix or suffix to make RMA reference numbers easy to recognise.
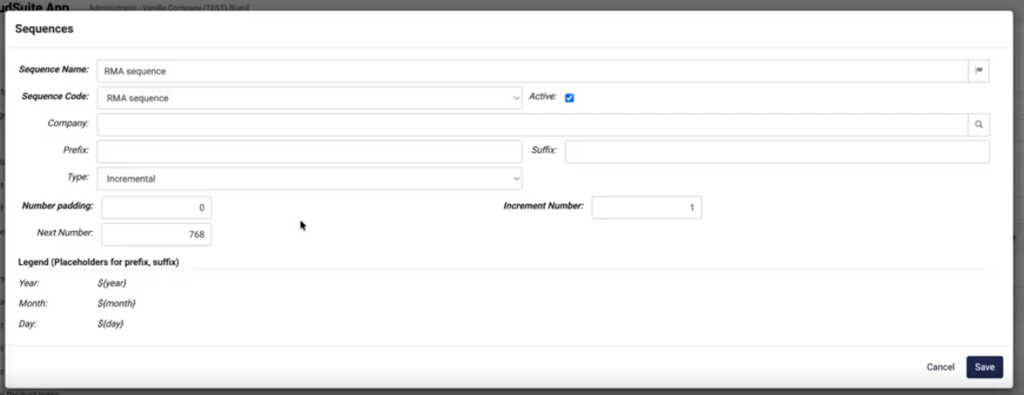
- Go to Administration > Sequences > Sequences.
- Open the RMA sequence, or click New to create one.
- In Prefix and Suffix, enter the text to appear before and after the number. You can use the placeholders ${year}, ${month} and ${day}.
- In Next Number, enter the first number to use.
- Click Save.
Set up the RMA Configuration
Configure the return rules and form fields for each shop. You can allow returns for products on a customer's orders, or also accept requests without an order. The latter can be useful if you operate a service point.
- Go to Order Management > RMA > RMA Configuration.
- Open an existing configuration, or click New to create one.
- Select the Shop.
- In RMA Reference Sequence, select the sequence for the return numbers.
- In Days retour possible, enter the number of days after shipment in which customers can return a product. If you leave this field empty, the period is 60 days.
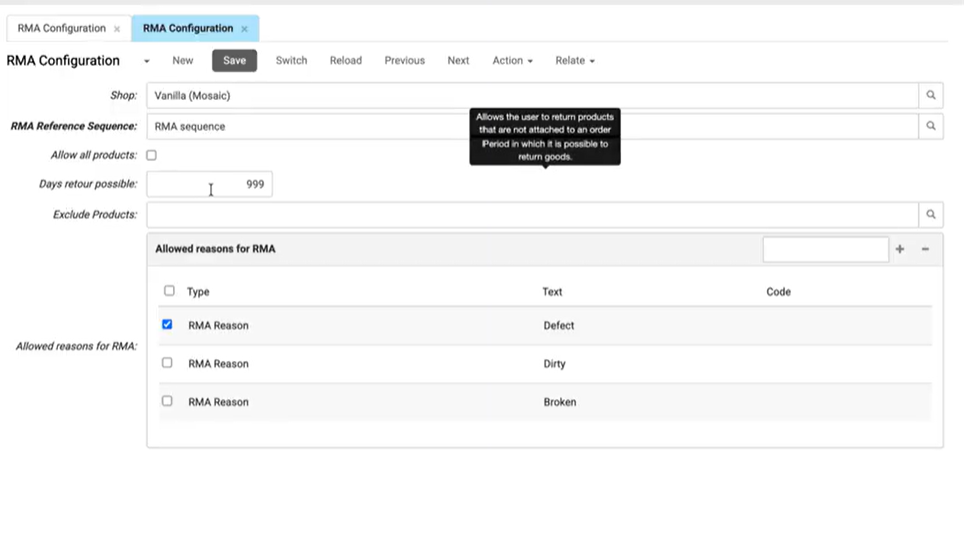
- Check Allow all products to permit return requests for any product in the shop, even if the customer has no order for it. Leave it unchecked to allow returns only for eligible products on the customer's orders in CloudSuite, such as synchronized ERP orders with a packing slip confirming delivery.
- In Exclude Products, select a tag containing products that cannot be returned. These products are excluded even when Allow all products is checked.
- Check Show memo field, Show memo 2 field and Show memo 3 field for each memo field that you want to show on the return form. All three are checked by default.
- In Max comment length, enter the maximum number of characters for the second memo field. If you leave this field empty, the maximum is 100 characters.
- Click Save.
Select the Allowed Return Reasons
In the shop's RMA configuration, select the reasons customers can use. You can limit a reason to specific products or require a photo, for example, to show damage.
- In Allowed reasons for RMA, add a line for each return reason that you want to use in this shop.
- Select the Reason for return.
- In Sequence, enter the position of the reason in the list.
- Check Required attachment if your customer must add an attachment (or image) for this reason.
- In Reason tag, select a tag to limit the reason to products with that tag. Leave it empty to make the reason available for all products.
- Repeat these steps for each reason you want to allow.
- Click Save.
If you do not add any reasons, all return reasons are available in the shop.
Allow Returns for a User Role
Allow return requests for the user roles that need access. Users with other roles cannot submit a return request.
- Go to Customers > Users eCommerce > User Roles.
- Open the user role you want to configure.
- Check RMA Requests allowed.
- Click Save.
Repeat these steps for each role that should allow return requests.
Set up the Confirmation Email
Create the email customers receive after submitting a return request. Set up a template for each language used in the shop.
- Go to E-Commerce > Shop Emails.
- Click New.
- Set Type to RMA Request.
- Select the Shop and Language.
- Enter the email subject and the content.
- Click Save.
Repeat these steps for each language of the shop.
CloudSuite uses the template in the language of the user. If that template does not exist, CloudSuite uses the template in the language of the shop. If there is no template, no confirmation email is sent.
Check the Result
Submit a return request to check that the settings work as expected.
- Log in to the webshop as a user with a role where RMA Requests allowed is checked.
- Go to My Account > My Returns.
- Create a return request for a product.
- Check that the return form shows the expected reasons, attachment and comment fields.
- Submit the return request.
- In the CloudSuite App, go to Order Management > RMA > RMA requests. Check that the request is in the list with a number from the sequence.
- Go to Stores > Email Log and check that the confirmation email was sent.