Registration Forms
A registration form lets the webshop visitor register by creating an account. What the form looks like is dependent on the type of shop: in a B2B shop you might ask for CofC and VAT numbers, which are not applicable in a B2C shop. You can even have multiple registration forms in one shop and let the user choose between them during registration. For example, in a combined B2C and B2B shop, you could ask if the visitor is a consumer (B2C) or a business (B2B) and continue accordingly.
To work with registration forms, in the CloudSuite App go to Stores > Registration Forms. An overview appears, listing all registration forms that have already been defined. Double-click an existing form to open its details or click New to create a new one.
- The first Name of the form is for internal reference.
- The second Name can be used to indicate whether the form addresses Consumers or Business users.
- Select the Language in which the form is active. If no language is selected, the form is active in all.
- Optionally, you may override the Default party set in the shop details.
- Optionally, you may override the Action registration setting specified in the shop details. This determines how to handle a user immediately after registration. The choice depends on the type of shop (B2B, B2C, B2R).
- Choose Active user with new created party if you want the user to place an order straightaway. A field Create Account becomes available (see below).
- Choose Registration process if you want to review the registration before allowing the user to order.
- Choose Registration process, ordering allowed if you want to allow the user to order immediately but hold the order until the registration has been approved.
- S field Create Account becomes available if Action registration is set to Active user with new created party. You may use this to optionally override the Anonymous sales setting in the shop details.
- Choose Always to force a new user through the registration process.
- Choose Never to let a new user order without registering.
- Choose Optional (default no) or Optional (default yes) to offer registration to the user, with a default choice favoring registration or not.
- The Success Redirect is the page which must be shown on successful registration using this form.
Descriptions
This tab lets you specify which sections are present in the form. Sections for which you do not provide a label (in the first column) will not be included. You may also provide a Description for each section, which will also be displayed in the form.
Both the label and the description can be translated.
'Fields's
The fields inside each of the sections are defined and configured in the remaining tabs, one per section.
You can create your own fields as you see fit. For each, the same details are specified.
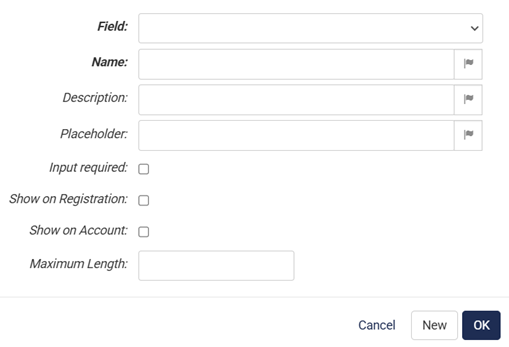
- Next to Field, choose the field's type.
- The Name of the field will be shown in the form, and can be translated.
- The (optional) Description will also be shown in the form, and can be translated.
- If you enter a Placeholder, this text will be shown in the form field as long as it is still empty. The placeholder text serves as a prompt to help the customer fill in the value. If you have shops in different languages, you can translate your placeholder texts.
- If Input required is checked, the user cannot submit the form unless the field has been filled.
- You may enter a Maximum Length for the field's value.
Notes
- To enable registration, Registration Available must be set in the shop details.
- To allow users to go through checkout without creating an account in a shop where registration is enabled, Anonymous Sales must be set in the shop details.