Setting Up Google Tag Manager (GTM)
Setting Up Your GTM Container
Before you can integrate Google Tag Manager into your webshop, follow the instructions on the Google Tag Manager site at https://tagmanager.google.com/ to set up your GTM container.
Activating the GTM ID in CloudSuite
- In the CloudSuite App, go to Stores > Shops and open your shop.
- In the shop details, go to the tab Defaults and click on magnifying glass icon next to API Profile.
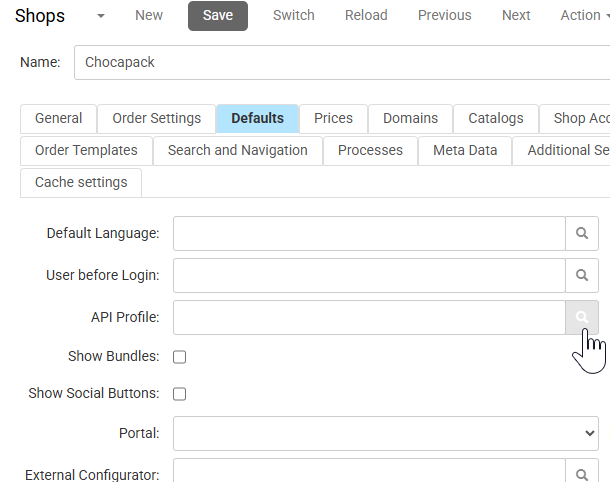
- Select or create an external profile.
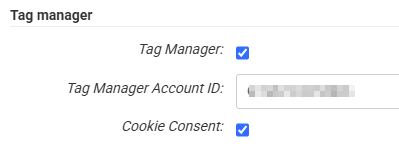
- In the Tag manager section:
- Check the box Tag Manager.
- Enter the correct Tag Manager Account ID.
- If the Cookie Consent Banner V2 has been configured in Google Tag Manager, you can check Cookie Consent to prompt the user to accept cookies.
- Click the Save button in the External window.
- Click the Save button in the shop details.
Check if it Works
- In your browser, view the page source of any page in your shop. (In many browsers, you do so by pressing Ctrl+U or by right-clicking and selecting View Page Source.)
- Check if you see the following in the source code:
(where XXXXXXX is your GTM account ID)
<!-- Google Tag Manager -->
<script>
  (function (w, d, s, l, i) {
    w[l] = w[l] || [];
    w[l].push({ "gtm.start": new Date().getTime(), event: "gtm.js" });
    var f = d.getElementsByTagName(s)[0],
      j = d.createElement(s),
      dl = l != "dataLayer" ? "&l=" + l : "";
    j.async = true;
    j.src = "https://www.googletagmanager.com/gtm.js?id=" + i + dl;
    f.parentNode.insertBefore(j, f);
  })(window, document, "script", "dataLayer", "GTM-XXXXXXX");
</script>
<!-- End Google Tag Manager -->