Setting Up Cookies Using Google Tag Manager
With Google Tag Manager (GTM), you can configure the cookies that are loaded on your website based on your users' preferences.
If you implement the CloudSuite Cookie Consent Banner V2 (see further down), you can be assured to follow European regulations with regard to the use of cookies in your shop. Cookies make it easy to keep track of information about your shop visitors. They can store site preferences and options (including a username), so that settings are retained between visits. However, many internet users feel that cookies are an invasion of privacy. They opt-out, and/or clear all cookies from their computer on a regular basis. You should never use cookies for critical functionality.
Within the Cookie notification, the following types of cookies are supported:
- Essential (default, cannot be deselected)
- Analytics
- Marketing
- Social
By default, no cookies are loaded: they must first be accepted. The accepted cookies are stored in the cs_cookie_prefs cookie.

Google Tag Manager needs to be set up to align with the user’s accepted cookies to make sure that specific components are only activated or loaded after the user has given consent. This can be achieved by using variables, tags and triggers. The most common and straightforward configuration method is described below.
First, open the Google Tag Manager at tagmanager.google.com.
Variables
Variables store values that can change based on certain conditions or inputs. They are used to capture and hold information that tags and triggers might need to function. For example, a variable could store the value of a form field, the URL of the current page, or the type of device the user is on.
- Go to Variables in the menu.
- Click the New button at User-Defined Variables.
- Click the building block icon.

- Select 1st-Party Cookie below Page Variables. This sets the first value of the 1st party cookie with the matching name.
- Enter the Cookie Name cs_cookie_prefs.
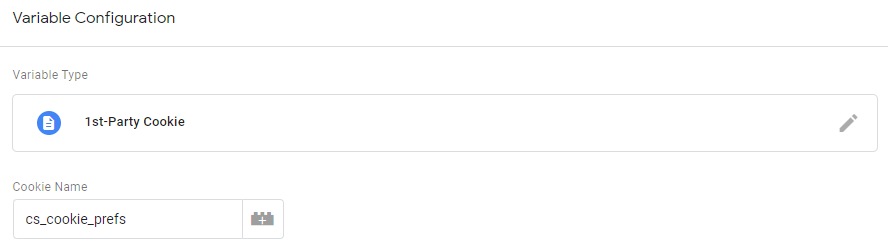
- Give the Variable a name.
- Click the Save button.
Tags
Tags are snippets of code that GTM deploys on your website. These tags often serve specific purposes, such as sending data to analytics tools, tracking conversions, or running remarketing campaigns.
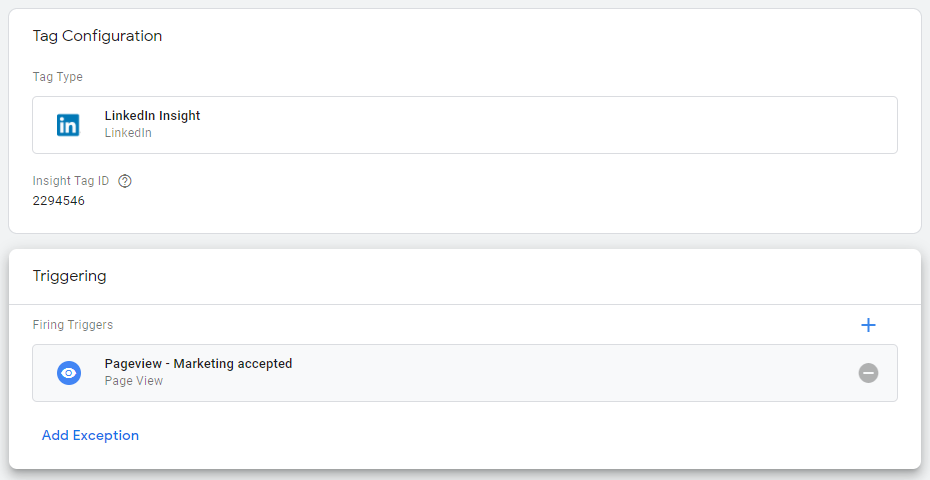
- Go to Tags in the menu. In this example, we load the tag LinkedIn Insight on all pages as soon as the marketing cookies are accepted.
- Click the New button.
- Click the icon with the label to configure the Tag.

- Select LinkedIn Insight below More
- Insert the Insight Tag ID (visit your LinkedIn Ad account to obtain your Insight Tag ID at ).
- Click the icon with the 2 rounds connected to set up the triggering.

- Select the trigger you have created and
- Give the Tag a name.
- Click the Save button.
Triggers
Triggers determine when a tag should be fired. They listen for specific events on your website, such as page views, button clicks, or form submissions, and instruct GTM to execute the associated tags when these events occur.
- Go to Triggers in the menu.
- Create a trigger of the Page View type for each cookie, with the condition that a specific type of cookie has been accepted:
- Click the New button.
- Click the icon with the 2 rounds connected.
- Select Page View below Page View.
- Select the option that the trigger fires on Some Page Views.
- Select Cookie consent contains marketing in the options below when to fire this trigger.

- Give the Trigger a Name.
- Click the Save button.
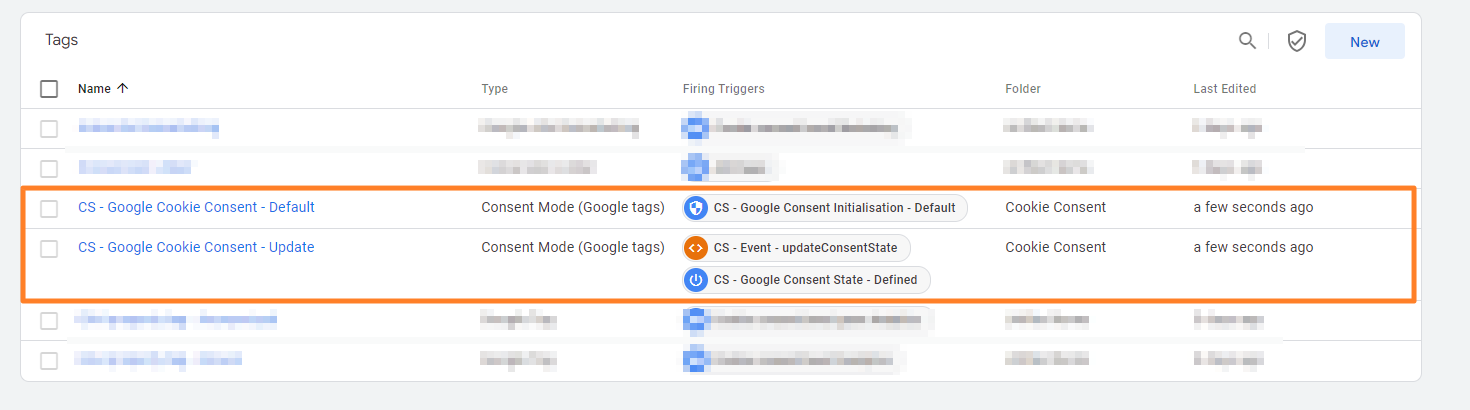
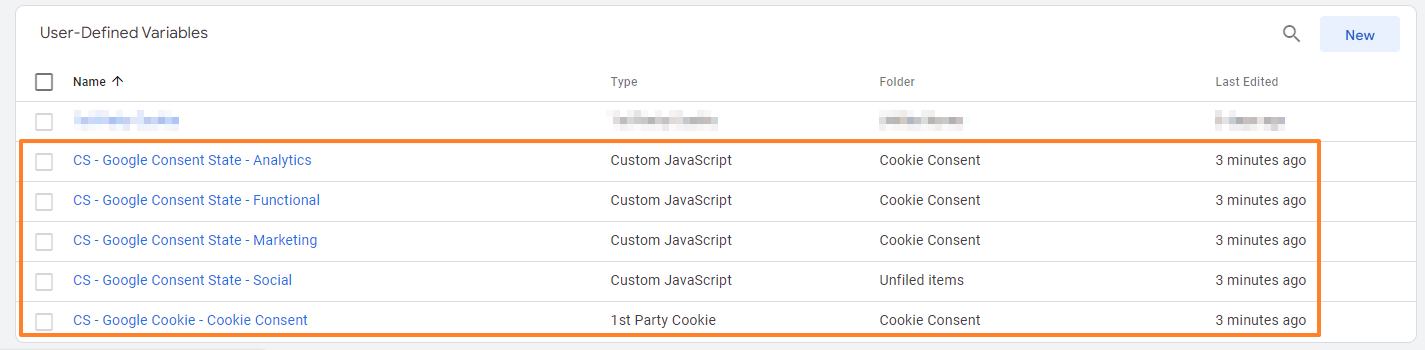
Cookie Consent Banner V2
We have implemented the modifications required to meet European regulations in the CloudSuite Cookie Consent Banner. To ensure that all consent data is successfully forwarded to Google, an adjustment in Google Tag Manager (GTM) is also necessary. To prevent you from having to configure the necessary modifications yourself, we have created a template that you can import into GTM.
- Download the template here.
- In Tag Manager's Admin tab, click on Import Container.
- Click Choose container file and upload the template file.
- Select the workspace where you want to add the new tags.
- Select Merge > Rename conflicting tags, triggers and variables.
- The following Tags and Variables are then created, making you compliant with Google's new Consent Mode v2.